Kale Chips —
Ready When You Are!

With kale chips, you're entering win-win territory in at least two ways. First, you get to chomp some yummies; second, you get to do your body a good deed at the same time. Since kale is loaded with vitamins A (lots) and C, plus protein, calcium, and iron, it's definitely not a veggie only for rabbits.
Although these chips do
take some time to prepare, and at first you may think you don’t even
like them, they do grow on you. The recipe yields between 30 and 50
wafers, depending upon their size.
Please DO NOT make this recipe if you or any
family members/close associates have a nut allergy! Or use a safe substitute for the nuts; sunflower kernels or pumpkin seed (a.k.a. pepitas) might work, if you have no problem with those.
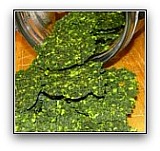
[Hoping to give you a better sense of what these look like, I enlarged the image probably more than I should. So, the resolution could be better...sorry.]
Kool Kale Chips
This recipe works best with a dehydrator, but you could also try baking the chips at 200-250 degrees until they seem done.
- 2 big bunches kale, nice and leafy
- 1/2 cup almonds
- *1/2 cup cashews (unsalted is best)
- 2 teaspoons chopped green chiles (or more to taste)
- 1 teaspoon nutritional yeast
- 2 teaspoon tamari or low-sodium soy sauce
- Juice of half a lemon
*Sometimes I substitute peanuts, Brazil nuts, or a combination
of cashews, peanuts, and sunflower kernels. Pumpkin seeds could make an
interesting addition as well. Try to find unsalted versions of these;
otherwise, substitute water for half of the soy sauce.
Preparation and Combining
- Remove your dryer shelves and cover with dryer paper or parchment, cut or folded to fit.
- Break the kale into large pieces, and then wash and spin in a salad spinner—or pat dry.
- In a mini-grinder, blend the nuts, chilies, yeast, soy sauce, and lemon juice into a paste.
- Finely chop half of the kale in a food processor, and then dump it into a large bowl.
- Spoon half of the lemon-nut paste onto the chopped kale and toss until evenly blended.
- Repeat the process in another bowl with the other half of the kale and paste. (I find the operation simpler with two bowls.)
Shaping
- When the kale mixture is fully blended, scoop onto the dryer shelves in heaping teaspoonfuls. Shape into rounds.
- As you fill each dehydrator shelf, place a sheet of wax paper over the kale balls. Then press each ball with something flat (and heavy, if possible) until the ball becomes a wafer.
- Carefully remove the wax paper (you may need a spatula), and place the shelf in the dehydrator.
Dehydrating
Dehydrate at 115 degrees until crunchy: 6 to 24 hours, depending upon the size of your dryer and the thickness of the wafers.
As noted above, with this recipe, I usually get 30 to 50 small wafers (roughly 2”
in diameter). Best of all—they cost way less and also taste way better (to me, at least) than
any commercial variety I've tried. Maybe you'll enjoy them, too.
Please understand that the material at this site is NOT medical advice, as I am neither doctor nor nutritionist. What I am is merely someone who's lived successfully on a vegetarian diet for many decades...and I transitioned from omnivore to vegetarian gradually. Do check with your doctor, though, if you're considering big changes to your own diet. Also, be sure to find a dependable source of Vitamin B12.
Living Vegetarian the Easy Way
Copyright 2010-2024. Lynda Edwards. All rights reserved.


